Want to capture great food photos? Then you must learn how to control your food photography settings.
In this article, I share everything you need to know to achieve sharp, well-exposed, beautiful images of food – so that, by the time you’re done reading, you’ll be ready to operate your camera like a pro.
Specifically, I explain how to choose the perfect:
- Camera mode
- Aperture
- Shutter speed
- ISO
- White balance
- Much more!
Bottom line: Whether you’re a beginner food photographer hoping to get started or you’re an amateur wishing to go professional, this article is bound to help you out.
Let’s get started!
The best settings for food photography: the basics
In this section, I take you through all the core food photography camera settings, starting with:
The best camera mode for food photos
I’ll come right out and say it:
The best camera mode for food photography is Manual mode.
When shooting in Manual, you’re in control of every camera setting, including the aperture, the shutter speed, and the ISO. You don’t leave anything to chance; that way, you can get the result you’re after every single time you press the shutter.
Note that, when shooting in Manual mode, your camera won’t select any exposure settings for you. Instead, you’ll need to do the heavy lifting. (It’s not as hard as it sounds! And in the next sections, I’ll explain exactly how you can tweak the latter settings for the best images.)
But if you feel intimidated by Manual mode, you can always start with one of your camera’s semi-automatic modes, such as Aperture Priority or Shutter Priority. These modes give you control over some settings while the camera selects the others, and they’re a great way to ease off of Auto mode and toward careful, deliberate decision-making.
The best aperture for food photos
Aperture refers to a hole in the lens. By widening the aperture hole, you let in more light for a brighter exposure; by narrowing the aperture hole, you let in less light for a darker exposure.
But aperture also controls how much of your image is in focus.
Unfortunately, there’s not one single best food photography aperture setting. Instead, it depends on your artistic preferences.
If you want a shallow depth of field – that is, a shot that only features a sliver of the subject in focus – then use a wide aperture. It’ll help you separate the subject from the background, plus it’ll create a beautiful background blur. Shallow depth of field effects are also a great way to highlight specific food features.
On the other hand, if you want a deep depth of field – a shot with everything in focus from front to back – you must use a smaller aperture. Lenses have a sharpness sweet spot around f/8 to f/11, so if you’re after a deep depth of field effect, I’d recommend f/8 as a starting point.
The image on the left was shot with a wide aperture, while the image on the right was shot with a narrow aperture. Neither image is obviously better than the other, but the difference is significant:
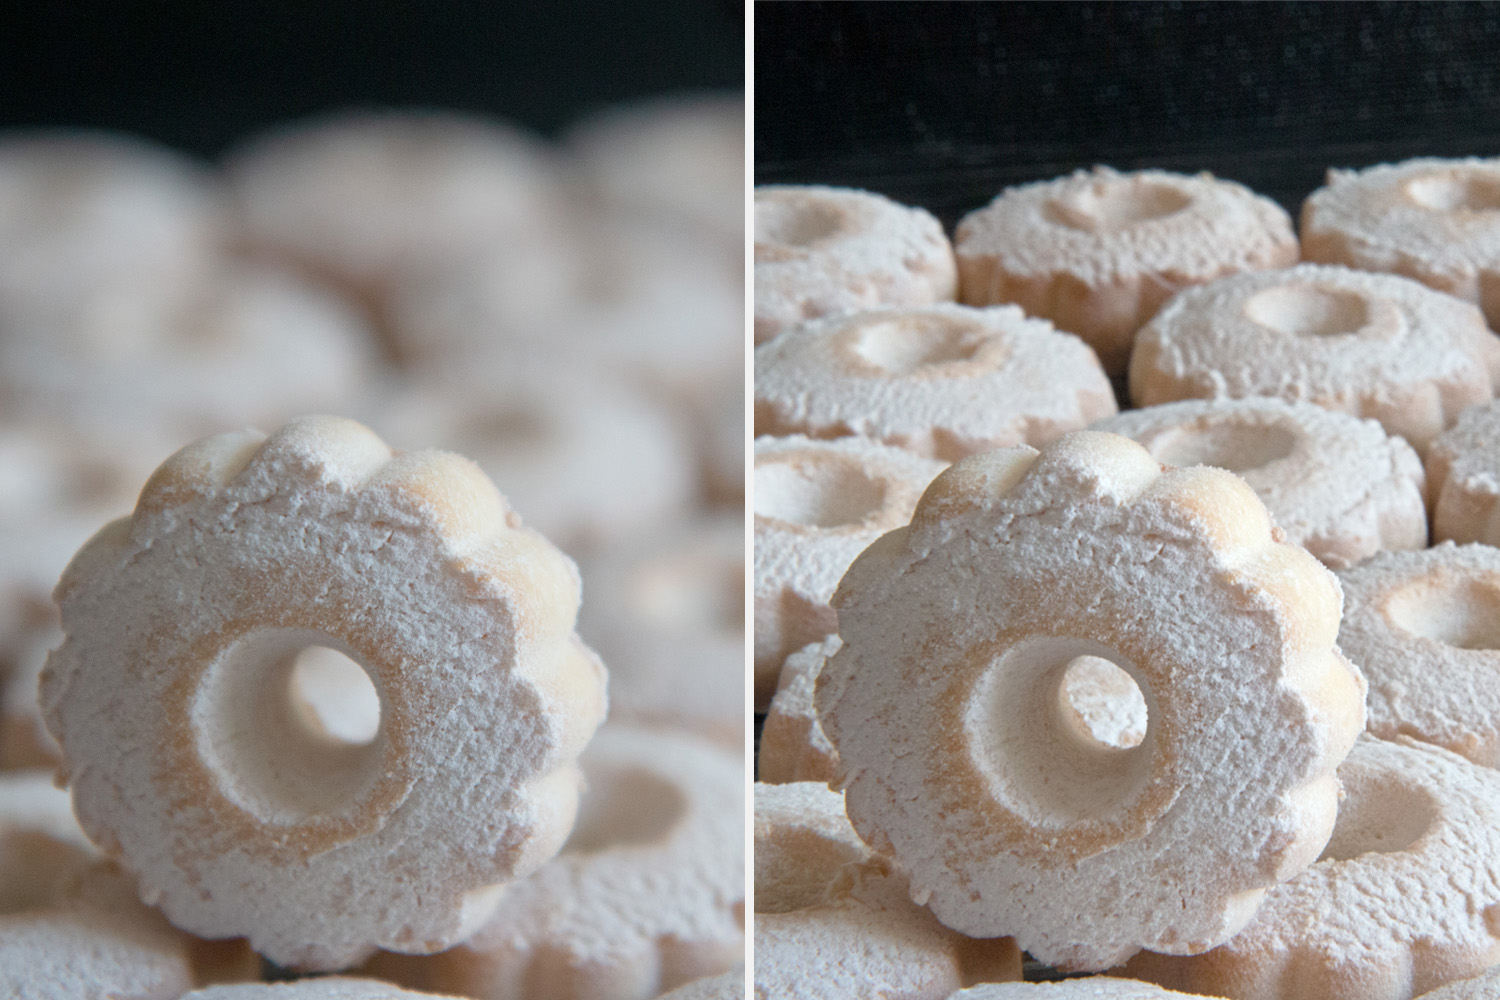
Canon 70D | 55mm | f/2.8 | 1/640s | ISO 800 (left)
Canon 70D | 55mm | f/22 | 1/13s | ISO 800 (right)
(Keep in mind that the lens focal length and the distance between the camera and the subject also influence the depth of field. You can use a depth of field calculator to figure out the specifics.)
One more thing:
If you want a deep depth of field but you can’t get everything in focus, you can always try a technique known as focus stacking, where you capture several shots – focused at different points – then blend them together for tack-sharp results.
The best shutter speed for food photos
The shutter speed refers to the length of time the camera sensor is exposed to the light. Faster shutter speeds result in darker exposures – but faster shutter speeds can also freeze moving subjects, which is helpful if you want to freeze a sprinkle of sugar, splashes on drinks, etc.
A slow shutter speed, on the other hand, will produce brighter exposures. Slower speeds will also create motion blur as subjects move through your shot. You can use this to capture a smooth stream of coffee as it’s poured out of a pot or a smooth stream of syrup as it’s poured on a stack of pancakes.
In other words, motion blur can be used as a creative tool that’ll make your photos more dynamic.
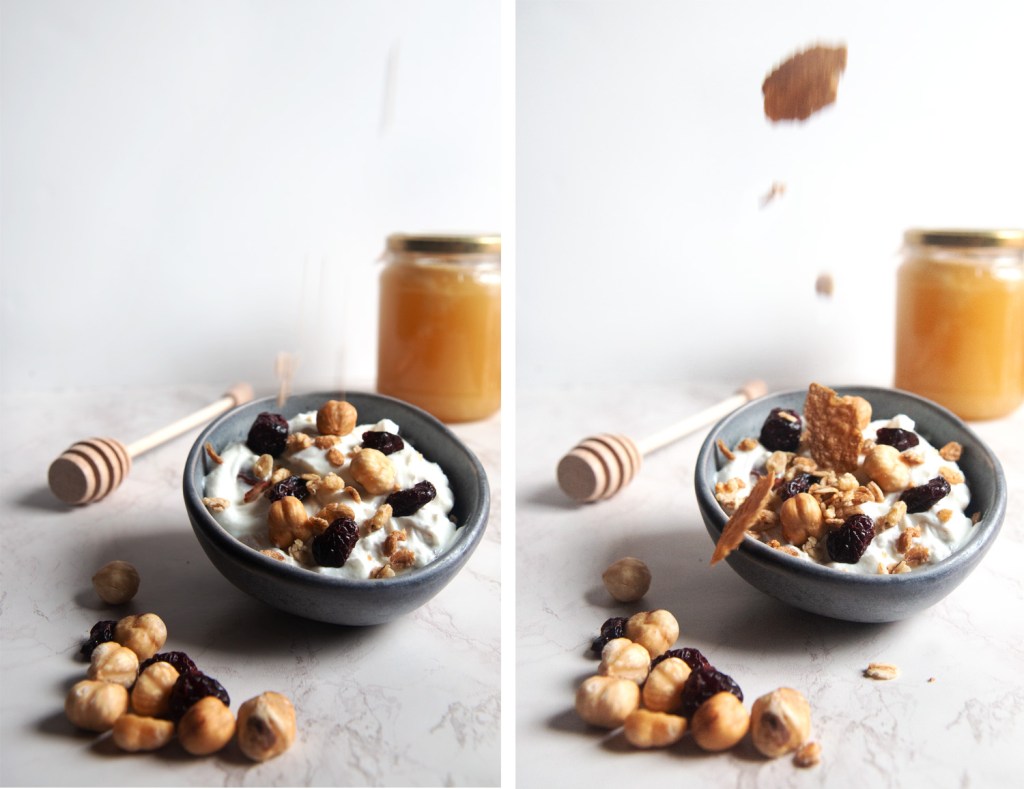
Canon 70D | 20mm | f/2.8 | 1/60s | ISO 250 (left)
Canon 70D | 20mm | f/4.5 | 1/400s | ISO 2000 (right)
Therefore, there is no best food photography shutter speed. Instead, you can use a fast shutter speed to freeze motion or you can use a slow shutter speed to blur motion; both are reasonable options and can produce stunning shots.
That said, you’ll need to keep your shutter speed fast enough to prevent blur due to camera shake (i.e., blur caused by your hands moving as they hold the camera). The rule of thumb to avoid camera shake is to keep the shutter speed above the focal length. In other words, if you’re using a 50mm lens, keep the shutter speed above 1/50s; if you’re using a 200mm lens, keep the shutter speed above 1/200s; and so on.
The best ISO for food photos
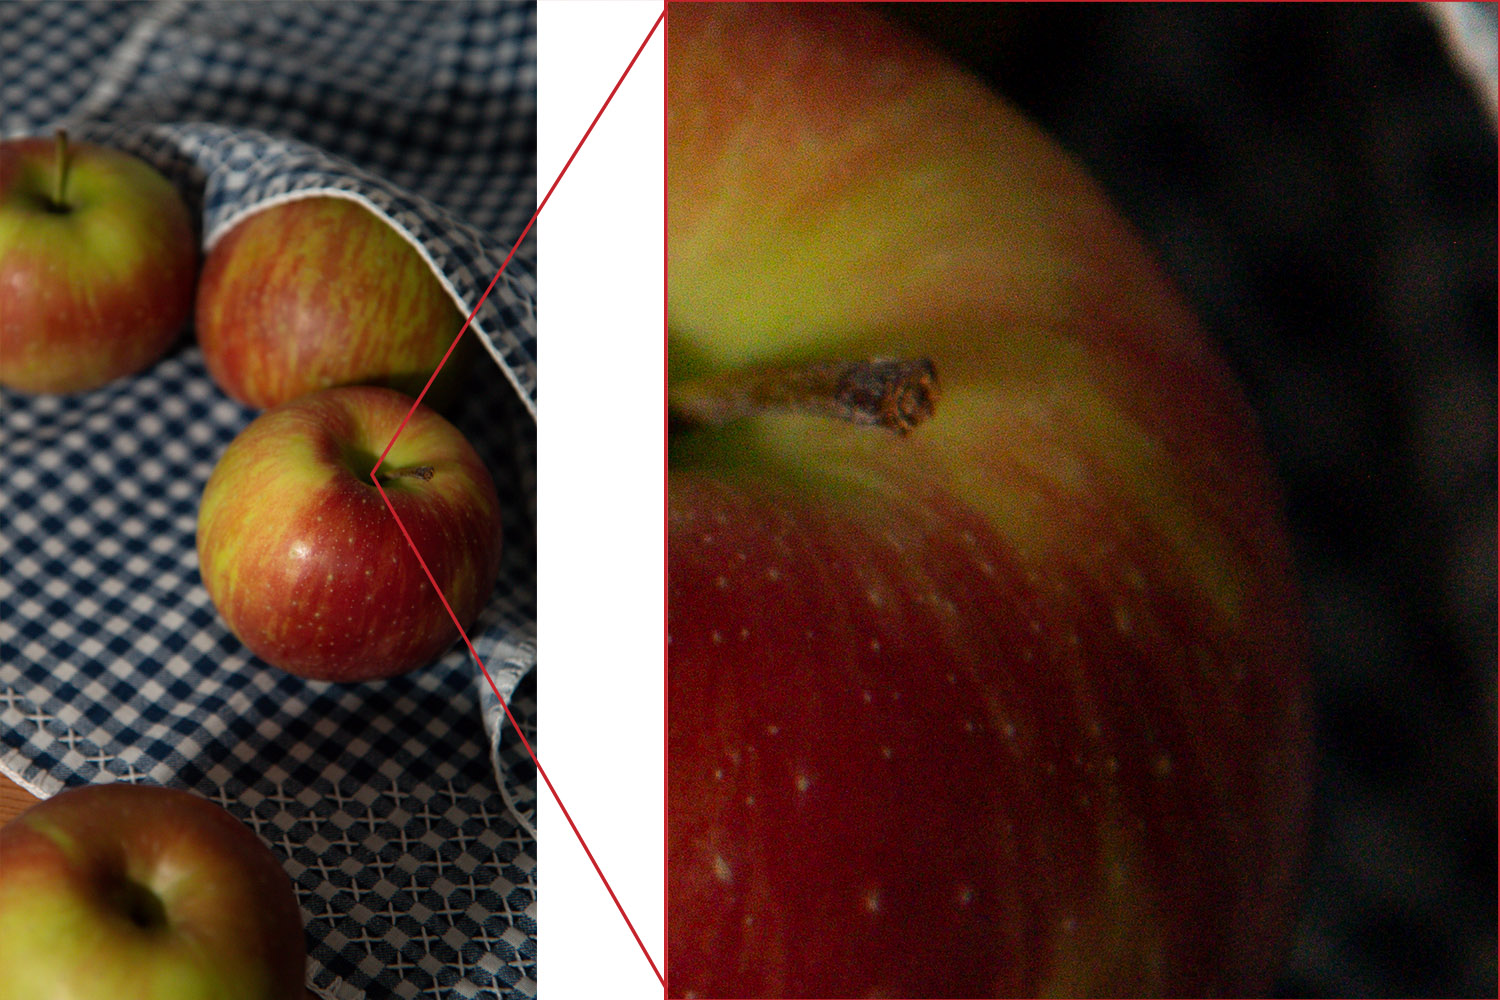
All cameras have an ISO range that determines the minimum and maximum sensitivity of the sensor. Many recent cameras even have an extended range. However, you’ll very rarely use maximum ISO values in food photography.
Why? While higher ISO numbers mean that you can photograph in low-light situations – that is, the higher the ISO, the brighter the exposure – they also guarantee noise and lower-quality files.
Noise is a grainy effect that you’ll often see in nighttime images. While most editing programs do have a tool to diminish and reduce noise, this normally results in a loss of sharpness. (In other words, it’s not ideal!)
My recommendation? Shoot at the lowest ISO that you can afford. And whenever you need to boost your ISO past its minimum, go as carefully as possible.
Pro tip: Make some test photos with your camera. Photograph at different ISO values and see how your camera behaves! That way, you know exactly what you’re getting each time you raise the ISO.
Advanced food photography settings
While the aperture, shutter speed, and ISO control most of the key food photography features, there are a few additional settings worth considering.
The best white balance for food photos
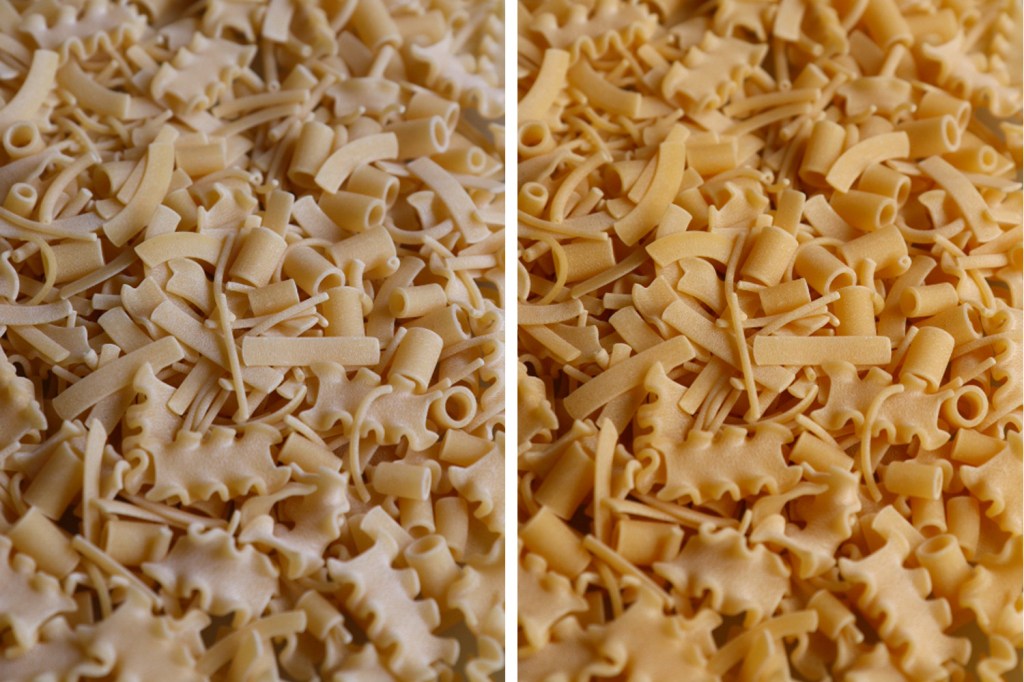
Canon 70D | 55mm | f/5 | 1/80s | ISO 100
White balancing aims to correct unwanted color casts in your images, and most cameras offer two broad options:
Auto White Balance, or AWB, which lets the camera make the white balancing decisions.
And manual white balance, where you tell your camera exactly how you want it to handle different situations.
AWB usually does a good job, but it’s not perfect – and when you’re doing professional food photography, you need total control over the shot. Plus, Auto White Balance can result in a significant change from one image to the next, which isn’t such a good look.
That’s where your camera’s manual white balance options come in. Most cameras have an array of preset white balances, such as Direct Sunlight, Cloudy, Fluorescent, etc. These don’t allow for lots of precision, but they’re certainly a step up from your camera’s AWB.
Some cameras also allow you to input a Kelvin value; this is an easy way to handle scenes lit by strobes or continuous lights. Simply identify the light color temperature, then select the correct Kelvin value on your camera.
Another fully manual white balance setting is the Custom feature. Here, you can place a white sheet in front of your subject, take its photo, then tell your camera to use the sheet photo as a white balance reference. Setting up the Custom process does vary from camera to camera, so you’ll need to check your user’s manual to determine the specific steps. It’s usually pretty easy, though!
The best focusing mode for food photos
These days, cameras offer lots of focusing options. Fortunately, picking the perfect focusing mode for food photography is a quick process.
First, ask yourself: Do I want to use autofocus or manual focus?
In certain scenarios – where you’re working in low light or your scene features very little contrast, manual focus is the way to go. You’ll also want to choose manual focus if you’re hoping to focus stack your shots (and your camera doesn’t have a focus bracketing feature).
However, manual focus can become an unnecessary challenge in some situations. For instance, if you’re hoping to create a food photo with motion or you’re working with a shallow depth of field, focusing manually will often result in a blurry image.
If you decide to use autofocus, then you’ll need to choose between your camera’s AF-S mode (where the focus is acquired and then locked) and your camera’s AF-C mode (where the focus is continuously acquired). AF-C is particularly useful when shooting moving subjects – it’ll let you track a falling food item or a chef as they glide through the frame – while AF-S is nice when your subject is stationary.
The best metering mode for food photos
Your camera’s metering mode determines how the camera evaluates exposure, and when you’re faced with even lighting and the tones are more or less uniform throughout the photo, the specific mode doesn’t make such a big difference.
However, when you have a high-contrast scene or you want to achieve a special effect (think high- and low-key photography), then you must absolutely pay attention to the metering mode.
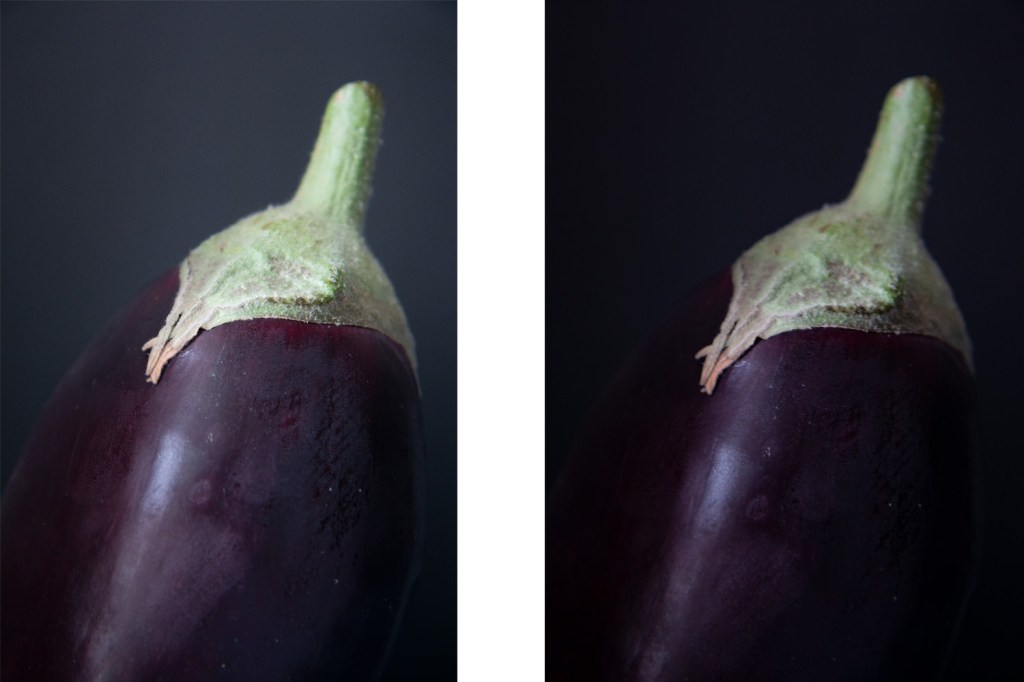
Canon 70D | 55mm | f/2.8 | 1/30s | ISO 400 | Spot metering (right).
Look at the eggplant images above. The lighting setup was exactly the same, but I used my camera’s default mode for the left-hand image and spot metering for the right-hand image. The default metering mode tried to compensate for the apparent lack of light and made everything look gray. But the spot metering mode allowed me to specify where I wanted the camera to evaluate the light, and it gave me a much better result.
Food photography settings: final words
As you can see, the best food photography settings vary depending on the light conditions, the subject, the ambiance, the story you want to tell, and your photographic style.
So read this guide carefully. And learn how to apply different settings in different situations!
Now over to you:
Which food photography settings are giving you trouble? How will you approach your settings in the future? Share your thoughts in the comments below!
